Lexicon Model 200 reverb
This classic Lexicon reverb was introduced 1984. It got the special nice and open reverb sound Lexicon is famous for. Even with the long 99 sec or endless reverb settings, the sound never get dull or to huge. It stays open and clear. No sonic mud.
The only not that nice things to say about this reverb is its used market price tag, the bulky size and the annoying fan to cool the housing full of vintage digital electronics.
The limited bandwidth of 10 kHz is not a real problem, because you get real high frequencies in real world rooms only seldom. You would need to go into a tiled room or real hard and very flat wall covering.
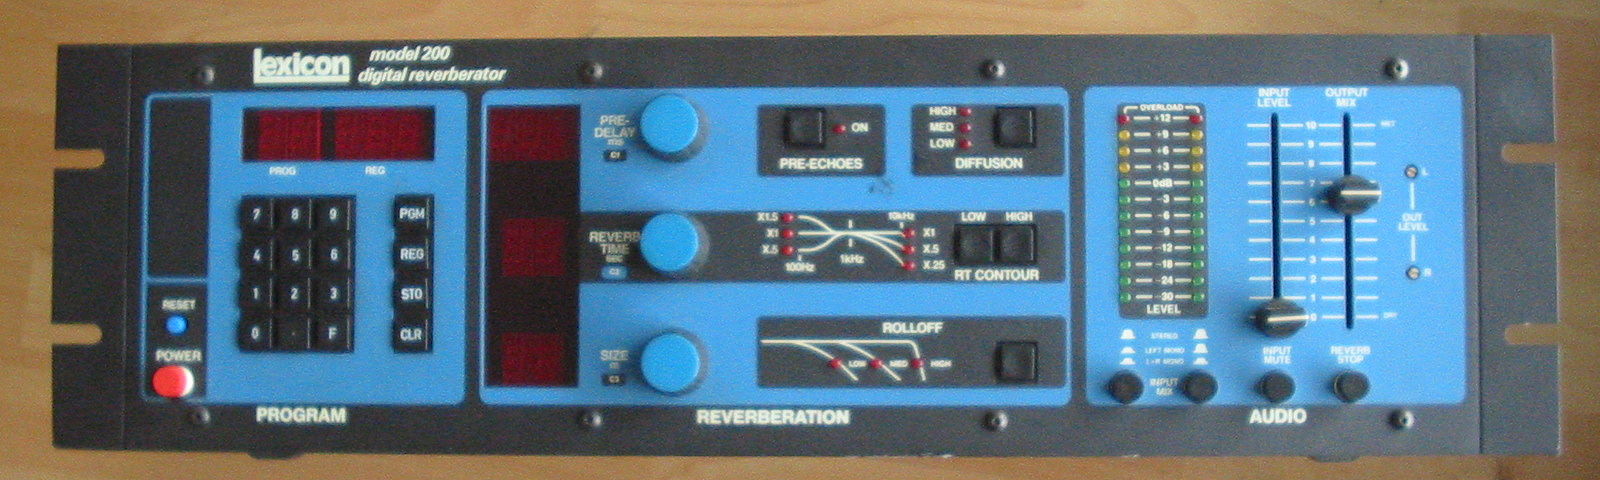
The units frontplate is divided in three main sections:
- Program
- Reverbation
- Audio
Program
You select the different reverb types here (assuming software 1.3 or higher):
- Halls
- Plates
- Chambers
- Rich Plates
- Rich Split
- Inverse Room
Reverbation
This is where you adjust the reverb settings to your needs. There are three endless encoders (remember: 1984!) with dedicated LED displays next to them.- Pre-delay (displayed in msecs)
- Reverb time (displayed in secs)
- (Room) Size (displayed in m)
The range of these parameters are difined by the used reverb time and the values of the others. You can't get a 99 sec reverb from a chamber reverb. And when you reduce the the room size, the max reverb time is also more and more limited. This is behaving, just like the real world reverb does.
You can switch the pre-delay on or off. The LED lights, when the pre-delay is set to on.
The reverbs diffusion is available in three qualities: high, medium and low. Three LEDs show you the selected value.
The reverbtime contour (labeled "RT-CONTOUR") is used to tailer the low end and high end reverb time by choosing different time factors here. The low end may set to factor 1.5, 1 0r 0.5 of the selected reverb time. The high frequencies may adjusted to 1, 0.5 or 0.25 factor. These three settings per frequency range is not much, but enough to get the needed results. You have to push the Low or High button in this section to tap through the three settings here. A LED shows you the selected factor of each band.
Finally there is a frequency limiting available namend ROLLOFF. it is again a three values only setting with a push button and three LEDs. The available settings are not named by frequencies, but high, mid and low. The Mmanual is more specific on this:
- High - 10 kHz at -2 dB point (48 dB / octave rolloff)
- Med - approximately 7 kHz (6 dB / octave)
- Low - approximately 3 kHz (6 dB / octave)
Audio
This is where you get a bar graph to show the input volume. You can select if the unit is working true stereo, mono or with individual left and right channel processing. Two sliders allow you to adjust the input gain and the output mix (wet / dry setting). Two LEDs warn you if clipping is reached.
The two momentary buttons under the level sliders let you mute the input (not the reverb!) while the button is pressed. The other stops the reverb tail. So you can easily adjust and test real long reverbs without waiting for the sound to die out to test the edited settings.
Backside
On the back you find the two balanced XLR input and the two balanced XLR outputs. So have the needed cables available when you use 1/4" jacks mainly. The gain-switch let you operate the inputs with zero or +20 dB gain. So you may connect dynamic microphones directly to this unit.
The Reverb Time 1/4" socket let you connect a normal footpedal. The controll output of the pedal's 50 kOhm variable resistor goes to the tip. The Sleeve is of cause ground. And the ring is the positice voltage. I am using the footpedals that work with my Moog Voyager and all my Waldorf synths for this without a problem. There are no artifacts heard when using the pedal to change the reverb time. The range of the pedal is automatically from zero to the adjusted (front side) reverb time.
It is possible to step through the stored reverb settings in accending order with the Program Step control jack. A momentary closing switch will do it.
The Input Mute socket is also requiring a momentary closed foot switch to stop the ingoing signal from going into the reverb engine. But unlike the front panel button, the ingoing signal is bypassed while the last sounds that went through the reverb engine dies out normally. So this is the real bypass switch with spillover function. So the sound of the reverb tail is not simply cut. So the reverb is natural dying and all new ingoing signal is passing through dry. well done. And again: this is a vintag digital reverb.